The first step is to create a SSH Key, this key will be used to connect to the instance once is created.
For this example, we will use "Puttygen":
Click in "Key".
Click in "SSH-2 RSA Key"
Click in "Generate" Button.
Move the cursor randomly until the progress bar is complete:
Once the key was generated, Click in "Save Private Key" Button to save the Private Key, putty uses the extension ppk. This key will be used to connect to the Instance:
Click in "Yes" and Save the private key:
For the Public Key, do not save it by using the button "Save Public Key". Instead of that, Select all the text in the field "Public Key for pasting into OpenSSH authorized_keys file":
Paste the text into a text file and save it, I will save it as "public.pub":
Now that we have the Private and Public Key Saved. Let's create the Instance. We will start from the Dashboard Page:
Click in the menu upper left corner and then in "Compute->Instances":
The Instance section will be displayed, click in the botton "Create Instance":
Specify the Instance Name, the Shape and the Image Operating System. It's very important that you select a SSH Key, or that you past the text of the SSH Key. In our example, we will paste the text of the Public SSH Key we created at the beginning of this article:
At the time, the following is the list of Operating System Images available:
The following is the list of Image versions available:
Once you specify all the information is requested, click in the button "Create Instance":
The instance will be displayed in "Provisioning" Status:
After some minutes, the instance will be in "Running" Status:
The instance was created.
Connecting to the Instance:
Now let's connect to the instance, to do so we will use Putty and also our Private SSH Key.
Click in "Connection" -> "Auth" and then in the field "Private Key file for authentication" select the Private SSH Key that we created at the beginning of this article:
Now let's specify the IP of the Instance in order to get connected:
Click in "Open" and when the terminal is open specify the user "opc":
lunes, 29 de octubre de 2018
How to Terminate an Instance in Oracle Cloud Infrastructure (OCI)
We will start from the Dashboard page:
Click in the Menu Icon in the upper left corner, and click in "Compute - > Instances":
All the existing instance will be listed:
Click in the icon ". . ." in the Right side of your instance and click in "Terminate":
You will be asked to select if you want to delete the attached Boot Volume Permanently. Click in "Terminate Instance":
The instance will become in "Terminating" Status:
After some minutes the instance will be in "Terminated" Status:
martes, 23 de octubre de 2018
How to create a VCN in Oracle Cloud Infrastructure (OCI)
First step is to login into your Oracle Cloud Account and go to your "Dashboard" page:
Click in the icon in upper left corner that displays the Menu and click in "Compute":
Creating a new Compartment:
This step is optional, just in case you want to create a new compartment, if you already have the one you want to use, skip this step.
Click again in the Icon in upper left corner that displays the Menu and click in Identity -> Compartments:
You will see the compartments that already exist, click in "Create Compartment":
Specify a name for the compartment and a description and then click in "Create Compartment":
The new compartment will be listed:
Creating a Virtual Cloud Network (VCN):
Click again in the Icon in upper left corner that displays the Menu and click in Networking-> Virtual Cloud Networks:
In left side, Select the compartment we just created "mycompartment" and then click in "Create Virtual Cloud Network":
There are two ways to create the VCN:
- Create Virtual Cloud Network only
- Create Virtual Cloud Network plus related resources.
Creating a VCN without related resources:
Select the name of the compartment where the VCN will be created, in this case, "mycompartment".
Specify the name of the VCN.
Select the option "Create Virtual Cloud Network Only"
Specify the CIDR text that describes the range of IPs for this VCN.
Select the option "Use DNS Hostnames in this VCN"
Specify a DNS Label for this VCN.
Click in "Create Virtual Cloud Network" button.
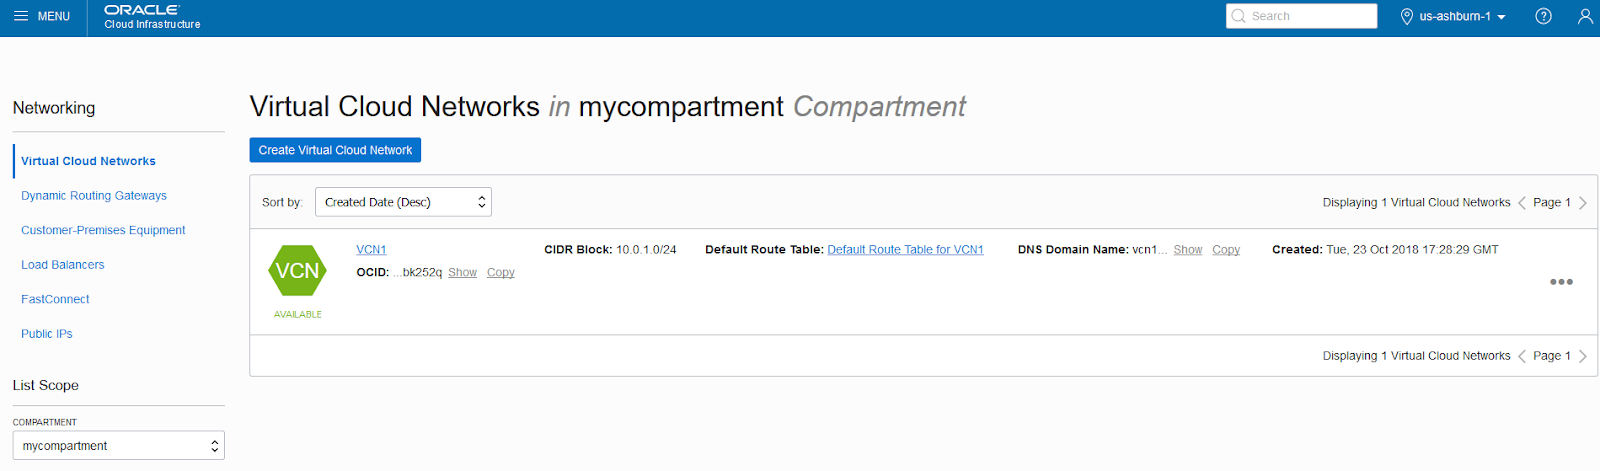
A new VCN will be listed:
The new VCN will create the following by default:
- 1 Route Tables
- 1 Secutiry List
- 1 DHCP Options
Details of the default Route Table:
Details of the default Security List:
Details of the default DHCP:
Creating a Virtual Cloud Network plus related resources:
This option will create a VCN, 3 Subnets, Routing Table, Security Groups and Internet Gateway using 10.0.0.0/16 CIDR range.
Select the Compartment where the VCN will be created.
Specify a name for the VCN
Select the option "Create Virtual Cloud Network plus related resources"
Select the option "Use DNS Hostnames in this VCN"
Click in button "Create Virtual Cloud Network"
A summary will be displayed, the VCN was sucessfully created. Click in "Close" button:
The new VCN will be listed:
The VCN will include by default:
- 3 Subnets
- 1 Route Tables
- 1 Internet Gateways
- 1 Security Lists
- 1 DHCP Options
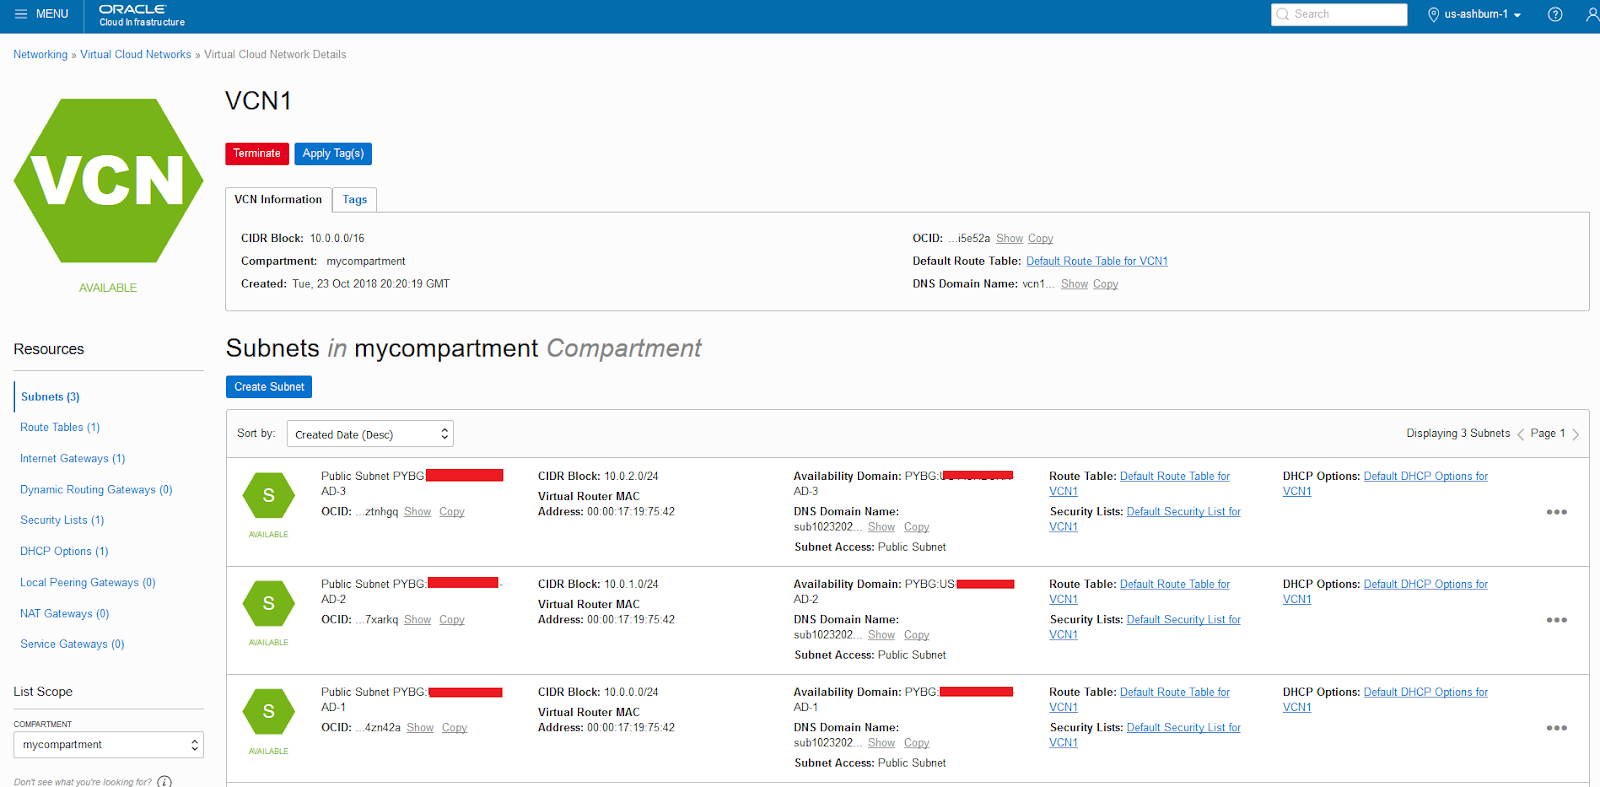
Details of the 3 Subnets created by Default:
Details of the Route Table created by Default:
Details of the Internet Gateway created by Default:
Details of the Security List created by Default:
Details of the DHCP Options created by Default:
How to Delete a VCN:
Go to the VCN Section (You can see the steps to get there at the beginning of this article):
Click in the three points at the right side ". . . " and click in "Terminate":
Click in "Delete All":
The VCN will be removed from the list:
Suscribirse a:
Entradas (Atom)
Oracle ACE Director Award - Deiby Gómez
Thanks #OracleACE Program for this awesome certificate recognizing the work I have done in the community for the last year. Looking forwa...
-
After migrate a VM with Microsoft Windows Server 2019 Standard to OCI, the instance was not responding in its public IP, even when I verif...
-
In this article I will show how to create a Second SCAN that can be used for a dedicated and isolated purpose. The initial configuration i...
-
In Oracle 21c we have two new parameters. MAX_IDLE_TIME MAX_IDLE_BLOCKER_TIME For the parameter MAX_IDLE_TIME, oracle documentation provid...