jueves, 26 de noviembre de 2020

ORA-600[ktliReadStreamAdvanceBuf_2] with DBMS_STATS.GATHER_FIXED_OBJECTS_STATS

 While working with  a database 12.1.0.2 I was trying to gather statistics in fixed objects however I was receiving the error ORA-600[ktliReadStreamAdvanceBuf_2] :


After to investigate, I found the note: ORA-600[ktliReadStreamAdvanceBuf_2] when Select on UNIFIED_AUDIT_TRAIL (Doc ID 2446958.1)

The note basically says that this is caused by the UNIFIED_AUDIT_TRAIL and there are two solutions:

  1. Upgrade to Oracle RDBMS 20.1.
  2. Apply Patch 27873364 if available for your version and platform.

However in the database UNIFIED AUDIT TRAIL is not used:


SQL> select parameter,value from v$option where parameter = 'Unified Auditing'

PARAMETER            VALUE
-------------------- --------------------
Unified Auditing     FALSE

SQL>

I confirmed that when I try to select rows from any view of unified audit trail the error is raised:


SQL> SELECT COUNT(*)  FROM V_$UNIFIED_AUDIT_TRAIL;
SELECT COUNT(*)  FROM V_$UNIFIED_AUDIT_TRAIL
                      *
ERROR at line 1:
ORA-00600: internal error code, arguments: [ktliReadStreamAdvanceBuf_2], [29],
[29], [117], [239], [1], [32], [32], [0], [], [], []

even in the table:

SQL> select count(*) from x$unified_audit_trail;
select count(*) from x$unified_audit_trail
                     *
ERROR at line 1:
ORA-00600: internal error code, arguments: [ktliReadStreamAdvanceBuf_2], [29],
[29], [117], [239], [1], [32], [32], [0], [], [], []


SQL>

Since my goal was to gather statistics in the fixed objects of the database, and since the database is not using unified audit trail, I decided to "exclude" only that specific table from the gather stats job:

SQL> exec dbms_stats.lock_table_stats('SYS', 'x$unified_audit_trail');

PL/SQL procedure successfully completed.

SQL> 

Then I executed again the gather stats job:

SQL> exec DBMS_STATS.GATHER_FIXED_OBJECTS_STATS ;

PL/SQL procedure successfully completed.

SQL> 

The job was Successful and I was able to gather statistics for all fixed objects except the unified audit trail table.

sábado, 2 de mayo de 2020

How to deploy an Oracle Autonomous Database 19c

Click in the main menu and then "Autonomous Transaction Processing":


Click in the button "Create Autonomous Database":


Type all the values required, In this example I am using the name "autonomousDB" for this DB deploy and also the version 19c:


Remember the password you are entering since this password will be used to connect to your database.


Put attention to the following option, because if you select a wrong one you can have issues if Oracle LMS audits your environment. Then click in the button "Create Autonomous Database".


The Autonomous DB will start to be created:


Wait until the DB is ready to be used. Now it's time to test the connectivity. To do so, click in the button "DB Connection":


Select "Instance Wallet":


Specify a password for the wallet and then click in the button "Download":


A Zip file will be downloaded, Unzip that file, you will see the following output:


Open the file "sqlnet.ora" and modify the value for the directory where you wallet is stored:


Before:

WALLET_LOCATION = (SOURCE = (METHOD = file) (METHOD_DATA = (DIRECTORY="?/network/admin")))
SSL_SERVER_DN_MATCH=yes
After:

WALLET_LOCATION = (SOURCE = (METHOD = file) (METHOD_DATA = (DIRECTORY="C:\Users\Deiby Gomez\Downloads\Wallet_autonomousDB")))
SSL_SERVER_DN_MATCH=yes

Then Copy the files "sqlnet.ora" and "tnsnames.ora" from the directory of your wallet and past them where your Oracle sqlplus Client is located.


Copy from wallet directory:


To Oracle sqlplus client directory:


If you open the file "tnsnames.ora" you will see several entries, you can use any of them to connect to your database:


I will use the String "autonomousdb_high":


OCI Instance with Windows does not respond in the public IP


After migrate a VM with Microsoft Windows Server 2019 Standard to OCI, the instance was not responding in its public IP, even when I verified that everything related to "Security Lists" and network rules were set properly.


In OCI website, the Instance appears with the status "RUNNING" without presenting any problem, as you can see bellow:


I created a Connection Console in order to investigate if there was something wrong with the boot process following the steps in the article How to connect with VNC to Oracle OCI Instance.


The result was interesting, the instance was OK. So it means that the problem it was somewhere else. I took a look into the network settings of the instance and everything was OK.

Then I checked the Firewall, and there was the problem! The Windows Defender was enabled as you can see bellow.


Then, I disabled the Firewall:


After to apply the changes, I tested the Ping again:


How to migrate VirtualBox VM to Oracle Cloud (Windows Server 2019 Standard)

In this article I will explain the steps that we have to follow in order to migrate an Oracle VirtualBox VM with Microsoft Windows Server 2019 Standard to Oracle Cloud as an Instance.

I have created a file inside the VM that will be useful as a mark so that when the VM is migrated we will be able to confirm that in fact, it's the correct machine.  The file is called "Deiby Gomez" with the Text "This is a Deiby's File":


In the official Documentation provided by Oracle. It says that only the following OS are supported in  OCI, so before to continue, be sure that you are planning to migrate a supported one:


Preparing the VM

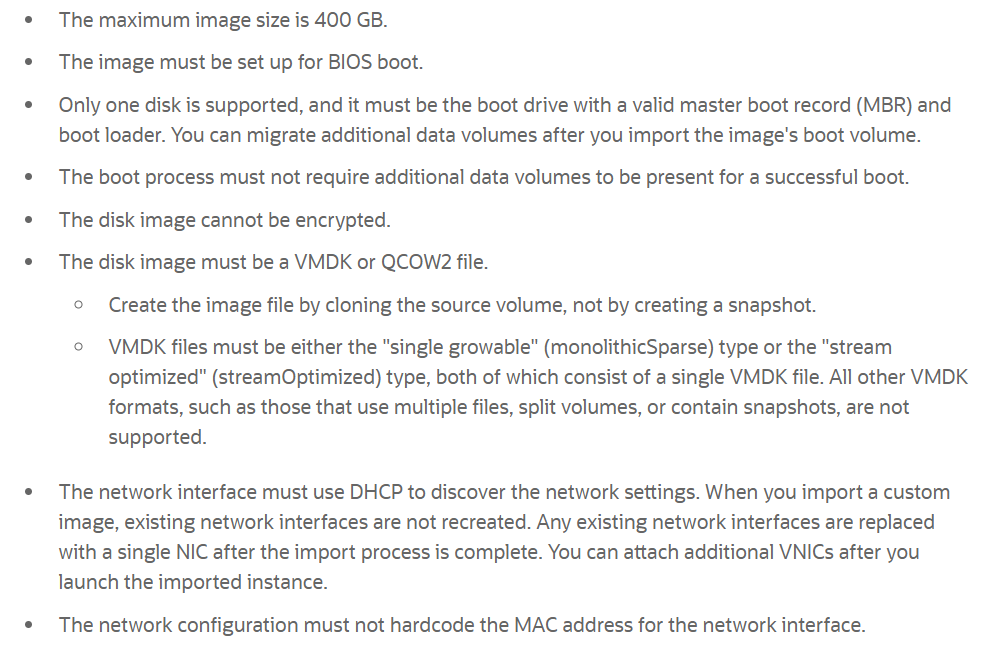
Oracle documentation also have some prerequisites we have to cumply before to migrate a Windows VM to OCI, here the list:


I verified all the prerequisites in my VM and the only one pending is to install virtio drives. First we have to download the installer from Oracle Software Delivery Cloud site.


In the "All Categories" list, select "Release":

Type "Oracle Linux 7.6" in the search box and click in the button "Search". Then select "REL: Oracle Linux 7.6.0.0.0" to add it to your cart. Click in "Checkout" to proceed. 


In the "Platforms/Languages" list, select "x86 64 bit". Click in the butotn "Continue":


Accept the license agreement and then click in the button "Continue". 

Select only the option "Oracle VirtIO Drivers Version for Microsoft Windows 1.1.4":


Click in the button "Download".

Transfer the file to your VM:


Execute the file "Setup.exe":


The installer will be initiated: 


Click in the button "Next":


Click in the option "Custom" and then in button "Next":


Click in "Install":


When the installation completes, it will ask to be rebooted, click in "Yes" and let it reboot. 


Exporting the VM from VirtualBox

Select the VM in VirtualBox:


Click in "File" menu and then "Export Appliance":


Click in "Next"


Specify the Directory where the export file will be stored, be sure that you select the option "Oracle Public Cloud Format 1.0":


Click in "Export":


Wait until the export completes:


Importing the VM into OCI:


Follow the steps in the article How to create an Instance Custom Template in Oracle Cloud using VMware VMDK Files.
If you want to upload the file with parallelism you can follow the steps in the article Using Multipart Upload with CLI to send a file to Oracle Object Storage


Creating the Instance from the Template:

When you have the export file in a Bucket, you will see a similar page than the fillowing one:


Click in "Compute" -> "Custom Images":


Click in the button "Import Image":


Specify all the values that are required, be sure that you  select the right OS, in this case "Windows" and then under "Operating System version", I selected "Server 2019 Standard". Then select the export file we have in our Object Storage Bucket called "WinServer2019"  under "Object name".


Select the format "VMDK" for the image type, and "Paravirtualized Mode" for the launch mode.


The image template will start to be created:


Creating the Instance:


Once the Instance custom template completes you will see a page similar to the next one. Here click in the button "Create Instance":


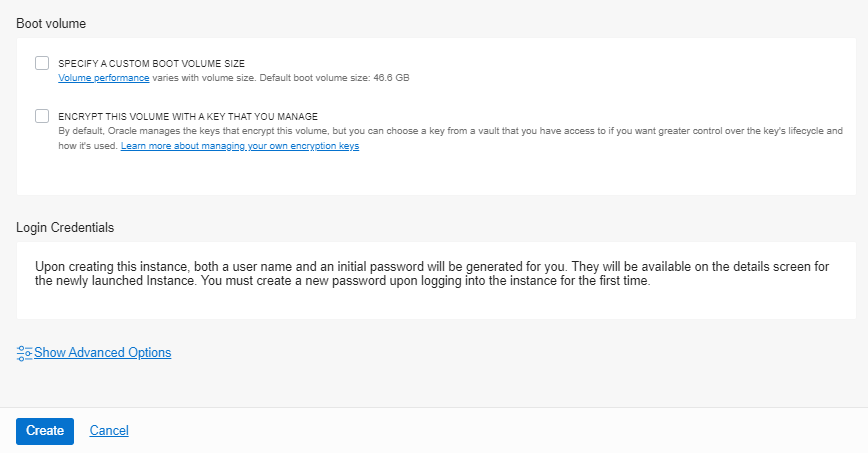
Specify all the values that are required. Be sure to select the Image Custom Template we just created previously, in this article we called it "WinServer2019Template". Then Click in the button "Create".


The Instance will start to be created:


Wait until it's completed:


Testing Connectivity:


The basic test is a Ping, I will  use the Public IP:


NOTE: If your instance does not respond in the public IP, check this article OCI Instance with Windows does not respond in the public IP.


Create a Console Connection following the steps in the article How to connect with VNC to Oracle OCI Instance


I will check the file I created at the beginning of the article just to confirm that my VM was not stolen in the middle of the process :) 


Oracle ACE Director Award - Deiby Gómez

Thanks #OracleACE Program for this awesome certificate recognizing the work I have done in the community for the last year. Looking forwa...