Mostrando entradas con la etiqueta migrate vm to oracle cloud. Mostrar todas las entradas

sábado, 2 de mayo de 2020

How to migrate VirtualBox VM to Oracle Cloud (Windows Server 2019 Standard)

In this article I will explain the steps that we have to follow in order to migrate an Oracle VirtualBox VM with Microsoft Windows Server 2019 Standard to Oracle Cloud as an Instance.

I have created a file inside the VM that will be useful as a mark so that when the VM is migrated we will be able to confirm that in fact, it's the correct machine.  The file is called "Deiby Gomez" with the Text "This is a Deiby's File":


In the official Documentation provided by Oracle. It says that only the following OS are supported in  OCI, so before to continue, be sure that you are planning to migrate a supported one:


Preparing the VM

Oracle documentation also have some prerequisites we have to cumply before to migrate a Windows VM to OCI, here the list:
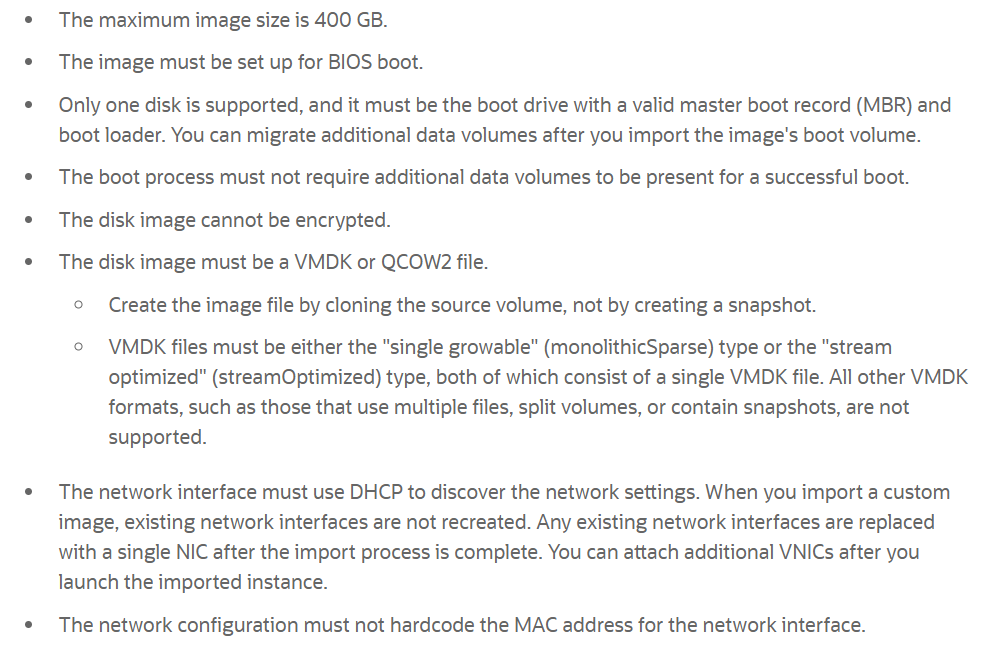


I verified all the prerequisites in my VM and the only one pending is to install virtio drives. First we have to download the installer from Oracle Software Delivery Cloud site.


In the "All Categories" list, select "Release":

Type "Oracle Linux 7.6" in the search box and click in the button "Search". Then select "REL: Oracle Linux 7.6.0.0.0" to add it to your cart. Click in "Checkout" to proceed. 


In the "Platforms/Languages" list, select "x86 64 bit". Click in the butotn "Continue":


Accept the license agreement and then click in the button "Continue". 

Select only the option "Oracle VirtIO Drivers Version for Microsoft Windows 1.1.4":


Click in the button "Download".

Transfer the file to your VM:


Execute the file "Setup.exe":


The installer will be initiated: 


Click in the button "Next":


Click in the option "Custom" and then in button "Next":


Click in "Install":


When the installation completes, it will ask to be rebooted, click in "Yes" and let it reboot. 


Exporting the VM from VirtualBox

Select the VM in VirtualBox:


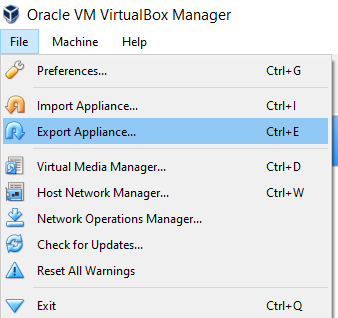
Click in "File" menu and then "Export Appliance":


Click in "Next"


Specify the Directory where the export file will be stored, be sure that you select the option "Oracle Public Cloud Format 1.0":


Click in "Export":


Wait until the export completes:


Importing the VM into OCI:


Follow the steps in the article How to create an Instance Custom Template in Oracle Cloud using VMware VMDK Files.
If you want to upload the file with parallelism you can follow the steps in the article Using Multipart Upload with CLI to send a file to Oracle Object Storage


Creating the Instance from the Template:

When you have the export file in a Bucket, you will see a similar page than the fillowing one:


Click in "Compute" -> "Custom Images":


Click in the button "Import Image":


Specify all the values that are required, be sure that you  select the right OS, in this case "Windows" and then under "Operating System version", I selected "Server 2019 Standard". Then select the export file we have in our Object Storage Bucket called "WinServer2019"  under "Object name".


Select the format "VMDK" for the image type, and "Paravirtualized Mode" for the launch mode.


The image template will start to be created:


Creating the Instance:


Once the Instance custom template completes you will see a page similar to the next one. Here click in the button "Create Instance":


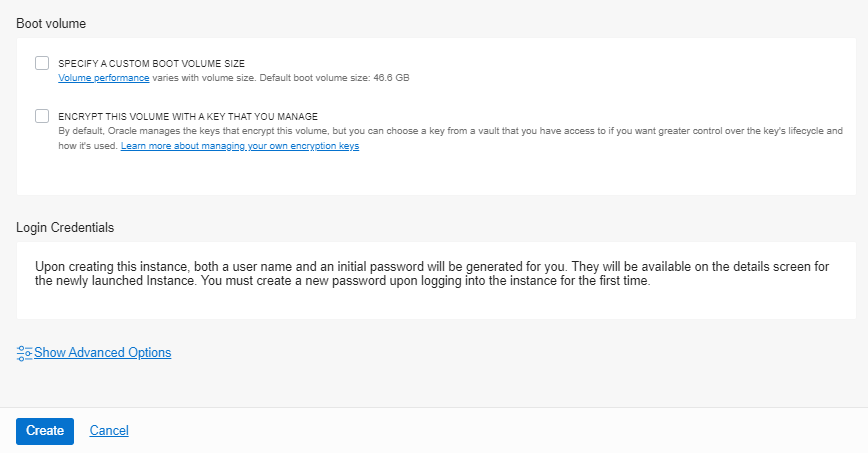
Specify all the values that are required. Be sure to select the Image Custom Template we just created previously, in this article we called it "WinServer2019Template". Then Click in the button "Create".


The Instance will start to be created:


Wait until it's completed:


Testing Connectivity:


The basic test is a Ping, I will  use the Public IP:


NOTE: If your instance does not respond in the public IP, check this article OCI Instance with Windows does not respond in the public IP.


Create a Console Connection following the steps in the article How to connect with VNC to Oracle OCI Instance


I will check the file I created at the beginning of the article just to confirm that my VM was not stolen in the middle of the process :) 


jueves, 23 de abril de 2020

How to migrate VirtualBox VM to Oracle Cloud (Linux 7.5 64-bits)

In this article I will show the procedure to migrate an Oracle VirtualBox VM with Oracle Linux 7  to Oracle Cloud Infrastructure as an Instance, check the kernel info:

[root@db12c ~]# uname -a

Linux db12c 4.1.12-112.16.4.el7uek.x86_64 #2 SMP Mon Mar 12 23:57:12 PDT 2018 x86_64 x86_64 x86_64 GNU/Linux

The VM running in VirtualBox:


Preparation of the VM:

Oracle has published some prerequisites we have to comply before to export the VM from VirtualBox:


So I am pretty sure about most of them, except the DHCP. After to check the VM I confirmed to used an static IP, so I changed it to use DHCP to get the IP automatically:


[root@db12c ~]# cat /etc/sysconfig/network-scripts/ifcfg-eth0
TYPE=Ethernet
BOOTPROTO=DHCP
DEFROUTE=yes
NAME=eth0
DEVICE=eth0
ONBOOT=yes
PREFIX=24
[root@db12c ~]#


NOTE: Check that your interfaz is called "eth0" because in Oracle Cloud that's the name your interfaz will receive. 

For example, in my VM I had the interfaz called "ifcfg-enp0s3", so I had to change this.

Next step is to confirm that virtio drivers are installed:


[root@db12c ~]# lsinitrd | grep -i virtio
virtio_net virtio_balloon' -f -v
[root@db12c ~]#

An empty output means the virtio drivers are not built inside initrd, so before to rebuilt it with the drivers, it's recommended to take a backup:


root@db12c ~]# ls -la /boot/initramfs-$(uname -r).img
-rw------- 1 root root 57899298 Apr 21 17:16 /boot/initramfs-4.1.12-112.16.4.el7uek.x86_64.img
[root@db12c ~]# cp /boot/initramfs-$(uname -r).img /boot/initramfs-$(uname -r).img.bak
[root@db12c ~]#

Then we can proceed to build initrd with virtio modules:

[root@db12c ~]# dracut --add-drivers "virtio virtio_ring virtio_pci virtio_scsi virtio_net virtio_balloon" -f -v /boot/initramfs-`uname -r`.img `uname -r`
Executing: /usr/sbin/dracut --add-drivers "virtio virtio_ring virtio_pci virtio_scsi virtio_net virtio_balloon" -f -v /boot/initramfs-4.1.12-112.16.4.el7uek.x86_64.img 4.1.12-112.16.4.el7uek.x86_64
dracut module 'busybox' will not be installed, because command 'busybox' could not be found!
dracut module 'dmsquash-live-ntfs' will not be installed, because command 'ntfs-3g' could not be found!
dracut module 'cifs' will not be installed, because command 'mount.cifs' could not be found!
dracut module 'busybox' will not be installed, because command 'busybox' could not be found!
dracut module 'dmsquash-live-ntfs' will not be installed, because command 'ntfs-3g' could not be found!
dracut module 'cifs' will not be installed, because command 'mount.cifs' could not be found!
*** Including module: bash ***
*** Including module: nss-softokn ***
*** Including module: i18n ***
*** Including module: network ***
*** Including module: ifcfg ***
*** Including module: drm ***
*** Including module: plymouth ***
*** Including module: kernel-modules ***
*** Including module: qemu ***
*** Including module: resume ***
*** Including module: rootfs-block ***
*** Including module: terminfo ***
*** Including module: udev-rules ***
Skipping udev rule: 40-redhat-cpu-hotplug.rules
Skipping udev rule: 91-permissions.rules
*** Including module: biosdevname ***
*** Including module: systemd ***
*** Including module: usrmount ***
*** Including module: base ***
*** Including module: fs-lib ***
*** Including module: shutdown ***
*** Including modules done ***
*** Installing kernel module dependencies and firmware ***
*** Installing kernel module dependencies and firmware done ***
*** Resolving executable dependencies ***
*** Resolving executable dependencies done***
*** Hardlinking files ***
*** Hardlinking files done ***
*** Stripping files ***
*** Stripping files done ***
*** Generating early-microcode cpio image contents ***
*** Constructing GenuineIntel.bin ****
*** Store current command line parameters ***
*** Creating image file ***
*** Creating microcode section ***
*** Created microcode section ***
*** Creating image file done ***
*** Creating initramfs image file '/boot/initramfs-4.1.12-112.16.4.el7uek.x86_64.img' done ***
[root@db12c 


Let's check if virtio modules are part of initrd:


[root@db12c ~]# lsinitrd | grep -i virtio
-rw-r--r--   1 root     root        29206 Mar 13  2018 usr/lib/modules/4.1.12-112.16.4.el7uek.x86_64/kernel/drivers/block/virtio_blk.ko
-rw-r--r--   1 root     root        59966 Mar 13  2018 usr/lib/modules/4.1.12-112.16.4.el7uek.x86_64/kernel/drivers/char/virtio_console.ko
-rw-r--r--   1 root     root        33342 Mar 13  2018 usr/lib/modules/4.1.12-112.16.4.el7uek.x86_64/kernel/drivers/scsi/virtio_scsi.ko
drwxr-xr-x   2 root     root            0 Oct  1  2018 usr/lib/modules/4.1.12-112.16.4.el7uek.x86_64/kernel/drivers/virtio
-rw-r--r--   1 root     root        22230 Mar 13  2018 usr/lib/modules/4.1.12-112.16.4.el7uek.x86_64/kernel/drivers/virtio/virtio.ko
-rw-r--r--   1 root     root        36398 Mar 13  2018 usr/lib/modules/4.1.12-112.16.4.el7uek.x86_64/kernel/drivers/virtio/virtio_pci.ko
-rw-r--r--   1 root     root        23582 Mar 13  2018 usr/lib/modules/4.1.12-112.16.4.el7uek.x86_64/kernel/drivers/virtio/virtio_ring.ko
[root@db12c ~]#

So now it's time to shutdown the VM and start the export:

[root@db12c ~]# shutdown now

Exporting the VM from Oracle VirtualBox:

Select the VM to be exported:


Click in "File" -> "Export Appliance"


Select the format "Oracle Public Cloud Format 1.0":


Click on the button "Export":


The VM will start to be exported:


Uploading the File that has the exported VM to Oracle OCI:


Follow the steps in the article How to create an Instance Custom Template in Oracle Cloud using VMware VMDK Files. If you want to upload the file with parallelism you can follow the steps in the article Using Multipart Upload with CLI to send a file to Oracle Object Storage


Creating the Instance from the Template:


Once we have the Template created, we will see a page similar to the following image,  then click in the button "Create Instance":


Specify the name of the new Instance and the Shape. In the "Image or operating system" select the template we just created in the previous step:


Specify the rest of the values, and then click in the button "Create":


The instance will start te get created:


Wait until the Instance is in status "RUNNING":


Testing the Connectivity:

The basic test is just a ping to the public IP:


Create a Console Connection following the steps in the article How to connect with VNC to Oracle OCI Instance


Oracle ACE Director Award - Deiby Gómez

Thanks #OracleACE Program for this awesome certificate recognizing the work I have done in the community for the last year. Looking forwa...