[root@db12c ~]# uname -a
Linux db12c 4.1.12-112.16.4.el7uek.x86_64 #2 SMP Mon Mar 12 23:57:12 PDT
2018 x86_64 x86_64 x86_64 GNU/Linux

Preparation of the VM:

So I am pretty sure about most of them, except the DHCP. After to check the VM I confirmed to used an static IP, so I changed it to use DHCP to get the IP automatically:
[root@db12c ~]# cat
/etc/sysconfig/network-scripts/ifcfg-eth0
TYPE=Ethernet
BOOTPROTO=DHCP
DEFROUTE=yes
NAME=eth0
DEVICE=eth0
ONBOOT=yes
PREFIX=24
[root@db12c ~]#
NOTE: Check that your interfaz is called "eth0" because in Oracle Cloud that's the name your interfaz will receive.
For example, in my VM I had the interfaz called "ifcfg-enp0s3", so I had to change this.
Next step is to confirm that virtio drivers are installed:
[root@db12c ~]# lsinitrd | grep
-i virtio
virtio_net virtio_balloon' -f -v
[root@db12c ~]#
An empty output means the virtio drivers are not built inside initrd, so before to rebuilt it with the drivers, it's recommended to take a backup:
root@db12c ~]# ls -la /boot/initramfs-$(uname -r).img
-rw------- 1 root root 57899298 Apr 21 17:16
/boot/initramfs-4.1.12-112.16.4.el7uek.x86_64.img
[root@db12c ~]# cp
/boot/initramfs-$(uname -r).img /boot/initramfs-$(uname -r).img.bak
[root@db12c ~]#
[root@db12c ~]# dracut
--add-drivers "virtio virtio_ring virtio_pci virtio_scsi virtio_net
virtio_balloon" -f -v /boot/initramfs-`uname -r`.img `uname -r`
Executing: /usr/sbin/dracut
--add-drivers "virtio virtio_ring virtio_pci virtio_scsi virtio_net
virtio_balloon" -f -v /boot/initramfs-4.1.12-112.16.4.el7uek.x86_64.img
4.1.12-112.16.4.el7uek.x86_64
dracut module 'busybox' will
not be installed, because command 'busybox' could not be found!
dracut module
'dmsquash-live-ntfs' will not be installed, because command 'ntfs-3g' could not
be found!
dracut module 'cifs' will not
be installed, because command 'mount.cifs' could not be found!
dracut module 'busybox' will
not be installed, because command 'busybox' could not be found!
dracut module
'dmsquash-live-ntfs' will not be installed, because command 'ntfs-3g' could not
be found!
dracut module 'cifs' will not
be installed, because command 'mount.cifs' could not be found!
*** Including module: bash ***
*** Including module:
nss-softokn ***
*** Including module: i18n ***
*** Including module: network
***
*** Including module: ifcfg ***
*** Including module: drm ***
*** Including module: plymouth
***
*** Including module:
kernel-modules ***
*** Including module: qemu ***
*** Including module: resume
***
*** Including module:
rootfs-block ***
*** Including module: terminfo
***
*** Including module:
udev-rules ***
Skipping udev rule:
40-redhat-cpu-hotplug.rules
Skipping udev rule:
91-permissions.rules
*** Including module:
biosdevname ***
*** Including module: systemd
***
*** Including module: usrmount
***
*** Including module: base ***
*** Including module: fs-lib
***
*** Including module: shutdown
***
*** Including modules done ***
*** Installing kernel module
dependencies and firmware ***
*** Installing kernel module
dependencies and firmware done ***
*** Resolving executable
dependencies ***
*** Resolving executable
dependencies done***
*** Hardlinking files ***
*** Hardlinking files done ***
*** Stripping files ***
*** Stripping files done ***
*** Generating early-microcode
cpio image contents ***
*** Constructing
GenuineIntel.bin ****
*** Store current command line
parameters ***
*** Creating image file ***
*** Creating microcode section
***
*** Created microcode section
***
*** Creating image file done
***
*** Creating initramfs image
file '/boot/initramfs-4.1.12-112.16.4.el7uek.x86_64.img' done ***
[root@db12c
Let's check if virtio modules are part of initrd:
[root@db12c ~]# lsinitrd | grep
-i virtio
-rw-r--r-- 1 root
root 29206 Mar 13 2018
usr/lib/modules/4.1.12-112.16.4.el7uek.x86_64/kernel/drivers/block/virtio_blk.ko
-rw-r--r-- 1 root
root 59966 Mar 13 2018
usr/lib/modules/4.1.12-112.16.4.el7uek.x86_64/kernel/drivers/char/virtio_console.ko
-rw-r--r-- 1 root
root 33342 Mar 13 2018 usr/lib/modules/4.1.12-112.16.4.el7uek.x86_64/kernel/drivers/scsi/virtio_scsi.ko
drwxr-xr-x 2 root
root 0 Oct 1 2018
usr/lib/modules/4.1.12-112.16.4.el7uek.x86_64/kernel/drivers/virtio
-rw-r--r-- 1 root
root 22230 Mar 13 2018 usr/lib/modules/4.1.12-112.16.4.el7uek.x86_64/kernel/drivers/virtio/virtio.ko
-rw-r--r-- 1 root
root 36398 Mar 13 2018
usr/lib/modules/4.1.12-112.16.4.el7uek.x86_64/kernel/drivers/virtio/virtio_pci.ko
-rw-r--r-- 1 root
root 23582 Mar 13 2018 usr/lib/modules/4.1.12-112.16.4.el7uek.x86_64/kernel/drivers/virtio/virtio_ring.ko
[root@db12c ~]#
So now it's time to shutdown the VM and start the export:
[root@db12c ~]# shutdown now

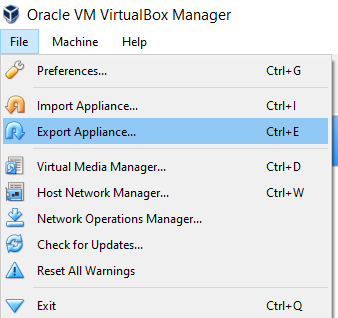
Select the format "Oracle Public Cloud Format 1.0":


The VM will start to be exported:

Uploading the File that has the exported VM to Oracle OCI:
Follow the steps in the article How to create an Instance Custom Template in Oracle Cloud using VMware VMDK Files. If you want to upload the file with parallelism you can follow the steps in the article Using Multipart Upload with CLI to send a file to Oracle Object Storage
Creating the Instance from the Template:
Once we have the Template created, we will see a page similar to the following image, then click in the button "Create Instance":

Specify the name of the new Instance and the Shape. In the "Image or operating system" select the template we just created in the previous step:

Specify the rest of the values, and then click in the button "Create":


The instance will start te get created:

Wait until the Instance is in status "RUNNING":

Testing the Connectivity:
The basic test is just a ping to the public IP:

Create a Console Connection following the steps in the article How to connect with VNC to Oracle OCI Instance


No hay comentarios:
Publicar un comentario