martes, 21 de abril de 2020

How to export VMware VM using Oracle Ravello VM Tool

First step is to Download VM Import Tool.

Select the platform where you will install the tool. In my case, I have selected Windows.


You know Windows :)  Just Next, Next, Next...


You can provide your Oracle Cloud credentials to upload the VMware VM to be exported, and importing it directly to Oracle Cloud. However I will use the offline mode in this article to use my laptop as a stage.

A webpage will be open, Select "Or switch to offline mode"


Log in into the VMware ESXi Server:


Select the VM that will be migrated to Oracle Cloud, if the VM cannot be selected then it's still running. Stop it first in ESX Server and then select it. 


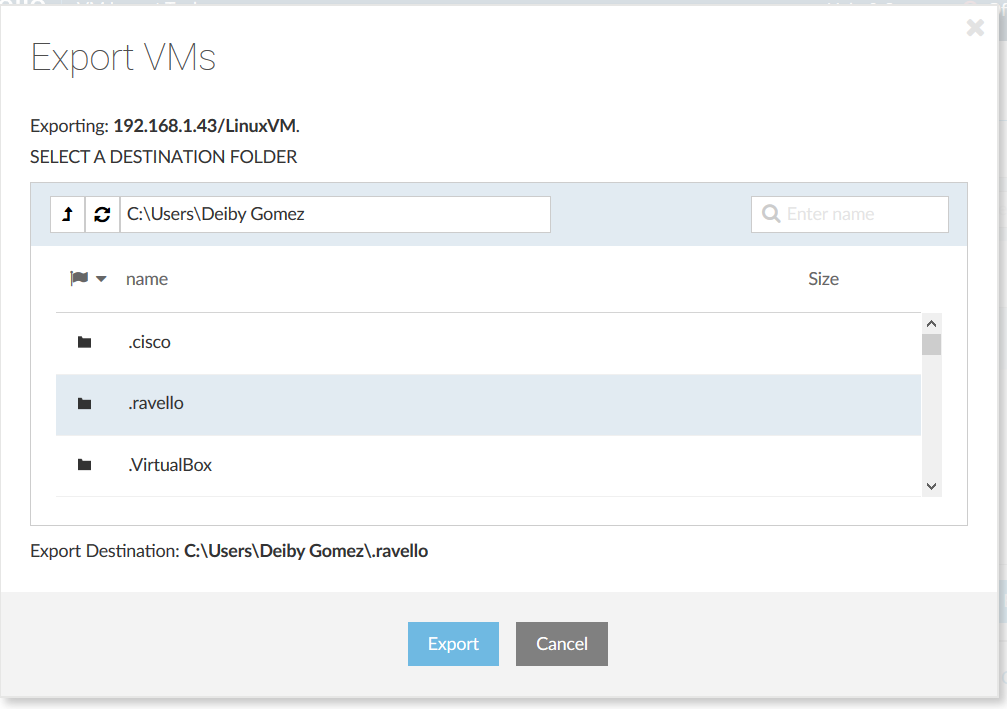
Select the Directory where the VM's files will be stored:


The VM's files will start to be transfered to your machine:


So the files are already in my laptop:


Once the files are local, we could upload it to Oracle Cloud and create an Intance Custom Template by using the instructions in this articles []


Not booting disk after importing VMware VM to Oracle Cloud

After importing a VMware VM into OCI the Instance was in the status "RUNNING", it seems everything was OK, however the instance was not accessible.


The Instance doesn't respond even with Ping to its Public IP, of course the Security groups were checked and everything was set properly:


Then I decided to create a Console Connection to get more feedback about the cause. When I visualized the instance with VNC I saw this error related to the booking disk in the Instance:


After Investigation, I found the root cause, the virtio drivers were not present in initrd.

To fix it, I had to rebuilt initrd.

Solution:

Check to confirm the virtio modules are built in initrd:

[root@localhost ~]# cp -p /boot/initrd-`uname -r`.img /tmp/initrd-`uname -r`.img.gz
[root@localhost ~]# zcat /tmp/initrd-`uname -r`.img.gz | cpio -it | grep virtio
10521 blocks
[root@localhost ~]#

In this case, virtio was not present.

Before to rebuilt initrd, create a backup:

[root@localhost ~]# cp /boot/initrd-$(uname -r).img /boot/initrd-$(uname -r).img.bak

Rebuild the initrd:

[root@localhost ~]# mkinitrd --with="virtio_ring virtio_pci virtio_scsi virtio_net " -f -v /boot/initrd-`uname -r`.img `uname -r`

Re-Import the VMware VM into Oracle Cloud, this time it should work.


lunes, 20 de abril de 2020

How to migrate VMware Virtual Machine to Oracle Cloud (Linux 5 32-bits)


The Virtual Machine  I am migrating is an Oracle Linux 5  32-bits,  running on VMware ESXi 6.0.0 and the version of the VM is 11. You can see the a Summary bellow:


Just as a mark, I am creating a file with the text "This is a Deiby's File" so that at the end of the procedure we can confirm that indeed is our machine.


Preparation of the VMware VM in ESX:

Oracle Documentation specify the following requirements:


My VMware VM comply with most of them, the only thing to check is the virtio drivers, then first step is to confirm that virtio drivers are available in the kernel:

[root@localhost ~]# grep -i virtio /boot/config-`uname -r`
CONFIG_NET_9P_VIRTIO=m
CONFIG_VIRTIO_BLK=m
CONFIG_VIRTIO_NET=m
CONFIG_VIRTIO_CONSOLE=y
CONFIG_HW_RANDOM_VIRTIO=m
CONFIG_VIRTIO=y
CONFIG_VIRTIO_RING=y
CONFIG_VIRTIO_PCI=m

CONFIG_VIRTIO_BALLOON=m

The three lines highlighted have to be set to "m".

Check to confirm the virtio modules are built in initrd:

[root@localhost ~]# cp -p /boot/initrd-`uname -r`.img /tmp/initrd-`uname -r`.img.gz
[root@localhost ~]# zcat /tmp/initrd-`uname -r`.img.gz | cpio -it | grep virtio
10521 blocks
[root@localhost ~]#

The virtio lines are not present (you should receive some lines with the string "virtio" as a result). Stop here, otherwise you will get problesm trying to boot your machine once is running in Oracle Cloud. For more details about this booting problem, read the article Not booting disk after importing VMware VM to Oracle Cloud 

Since the virtio modules are not present, we have to rebuild the initrd. Before It's recommended to create a backup:

[root@localhost ~]# cp /boot/initrd-$(uname -r).img /boot/initrd-$(uname -r).img.bak

Next step is to rebuild the initrd:

[root@localhost ~]# mkinitrd --with="virtio_blk virtio_pci" -f -v /boot/initrd-`uname -r`.img `uname -r`
Creating initramfs
Modulefile is /etc/modprobe.conf
Looking for deps of module sd_mod: crc-t10dif
Looking for deps of module crc-t10dif
Looking for deps of module ehci-hcd
Looking for deps of module ohci-hcd
Looking for deps of module uhci-hcd
Looking for deps of module ext3: mbcache jbd
Looking for deps of module mbcache
Looking for deps of module jbd
Looking for driver for device sda2
Looking for deps of module scsi:t-0x00: crc-t10dif sd_mod
Looking for deps of module pci:v00008086d00007111sv000015ADsd00001976bc01sc01i8a: ata_generic ata_generic ata_piix ata_piix pata_acpi
Looking for deps of module ata_generic
Looking for deps of module ata_piix
Looking for deps of module pata_acpi
Looking for deps of module ide-disk
Looking for deps of module ahci: libahci
Looking for deps of module libahci
Looking for deps of module dm-mod
Looking for deps of module dm-mirror: dm-mod dm-log dm-region-hash
Looking for deps of module dm-log: dm-mod
Looking for deps of module dm-region-hash: dm-mod dm-log
Looking for deps of module dm-zero: dm-mod
Looking for deps of module dm-snapshot: dm-mod
Looking for deps of module dm-mem-cache
Looking for deps of module dm-region_hash: dm-mod dm-log dm-region-hash
Looking for deps of module dm-message
Looking for deps of module dm-raid45
Looking for deps of module virtio_blk
Looking for deps of module virtio_pci
Using modules:   /lib/modules/2.6.39-400.215.10.el5uek/kernel/lib/crc-t10dif.ko /lib/modules/2.6.39-400.215.10.el5uek/kernel/drivers/scsi/sd_mod.ko /lib/modules/2.6.39-400.215.10.el5uek/kernel/fs/mbcache.ko /lib/modules/2.6.39-400.215.10.el5uek/kernel/fs/jbd/jbd.ko /lib/modules/2.6.39-400.215.10.el5uek/kernel/fs/ext3/ext3.ko /lib/modules/2.6.39-400.215.10.el5uek/kernel/drivers/ata/ata_generic.ko /lib/modules/2.6.39-400.215.10.el5uek/kernel/drivers/ata/ata_piix.ko /lib/modules/2.6.39-400.215.10.el5uek/kernel/drivers/ata/pata_acpi.ko /lib/modules/2.6.39-400.215.10.el5uek/kernel/drivers/ata/libahci.ko /lib/modules/2.6.39-400.215.10.el5uek/kernel/drivers/ata/ahci.ko /lib/modules/2.6.39-400.215.10.el5uek/kernel/drivers/md/dm-mod.ko /lib/modules/2.6.39-400.215.10.el5uek/kernel/drivers/md/dm-log.ko /lib/modules/2.6.39-400.215.10.el5uek/kernel/drivers/md/dm-region-hash.ko /lib/modules/2.6.39-400.215.10.el5uek/kernel/drivers/md/dm-mirror.ko /lib/modules/2.6.39-400.215.10.el5uek/kernel/drivers/md/dm-zero.ko /lib/modules/2.6.39-400.215.10.el5uek/kernel/drivers/md/dm-snapshot.ko /lib/modules/2.6.39-400.215.10.el5uek/kernel/drivers/block/virtio_blk.ko /lib/modules/2.6.39-400.215.10.el5uek/kernel/drivers/virtio/virtio_pci.ko
/sbin/nash -> /tmp/initrd.K10847/bin/nash
/sbin/insmod.static -> /tmp/initrd.K10847/bin/insmod
/etc/udev/rules.d/05-udev-early.rules -> /tmp/initrd.K10847/etc/udev/rules.d/05-udev-early.rules
/sbin/firmware_helper.static -> /tmp/initrd.K10847/sbin/firmware_helper
/sbin/udevd.static -> /tmp/initrd.K10847/sbin/udevd
copy from `/lib/modules/2.6.39-400.215.10.el5uek/kernel/lib/crc-t10dif.ko' [elf32-i386] to `/tmp/initrd.K10847/lib/crc-t10dif.ko' [elf32-i386]
copy from `/lib/modules/2.6.39-400.215.10.el5uek/kernel/drivers/scsi/sd_mod.ko' [elf32-i386] to `/tmp/initrd.K10847/lib/sd_mod.ko' [elf32-i386]
copy from `/lib/modules/2.6.39-400.215.10.el5uek/kernel/fs/mbcache.ko' [elf32-i386] to `/tmp/initrd.K10847/lib/mbcache.ko' [elf32-i386]
copy from `/lib/modules/2.6.39-400.215.10.el5uek/kernel/fs/jbd/jbd.ko' [elf32-i386] to `/tmp/initrd.K10847/lib/jbd.ko' [elf32-i386]
copy from `/lib/modules/2.6.39-400.215.10.el5uek/kernel/fs/ext3/ext3.ko' [elf32-i386] to `/tmp/initrd.K10847/lib/ext3.ko' [elf32-i386]
copy from `/lib/modules/2.6.39-400.215.10.el5uek/kernel/drivers/ata/ata_generic.ko' [elf32-i386] to `/tmp/initrd.K10847/lib/ata_generic.ko' [elf32-i386]
copy from `/lib/modules/2.6.39-400.215.10.el5uek/kernel/drivers/ata/ata_piix.ko' [elf32-i386] to `/tmp/initrd.K10847/lib/ata_piix.ko' [elf32-i386]
copy from `/lib/modules/2.6.39-400.215.10.el5uek/kernel/drivers/ata/pata_acpi.ko' [elf32-i386] to `/tmp/initrd.K10847/lib/pata_acpi.ko' [elf32-i386]
copy from `/lib/modules/2.6.39-400.215.10.el5uek/kernel/drivers/ata/libahci.ko' [elf32-i386] to `/tmp/initrd.K10847/lib/libahci.ko' [elf32-i386]
copy from `/lib/modules/2.6.39-400.215.10.el5uek/kernel/drivers/ata/ahci.ko' [elf32-i386] to `/tmp/initrd.K10847/lib/ahci.ko' [elf32-i386]
copy from `/lib/modules/2.6.39-400.215.10.el5uek/kernel/drivers/md/dm-mod.ko' [elf32-i386] to `/tmp/initrd.K10847/lib/dm-mod.ko' [elf32-i386]
copy from `/lib/modules/2.6.39-400.215.10.el5uek/kernel/drivers/md/dm-log.ko' [elf32-i386] to `/tmp/initrd.K10847/lib/dm-log.ko' [elf32-i386]
copy from `/lib/modules/2.6.39-400.215.10.el5uek/kernel/drivers/md/dm-region-hash.ko' [elf32-i386] to `/tmp/initrd.K10847/lib/dm-region-hash.ko' [elf32-i386]
copy from `/lib/modules/2.6.39-400.215.10.el5uek/kernel/drivers/md/dm-mirror.ko' [elf32-i386] to `/tmp/initrd.K10847/lib/dm-mirror.ko' [elf32-i386]
copy from `/lib/modules/2.6.39-400.215.10.el5uek/kernel/drivers/md/dm-zero.ko' [elf32-i386] to `/tmp/initrd.K10847/lib/dm-zero.ko' [elf32-i386]
copy from `/lib/modules/2.6.39-400.215.10.el5uek/kernel/drivers/md/dm-snapshot.ko' [elf32-i386] to `/tmp/initrd.K10847/lib/dm-snapshot.ko' [elf32-i386]
copy from `/lib/modules/2.6.39-400.215.10.el5uek/kernel/drivers/block/virtio_blk.ko' [elf32-i386] to `/tmp/initrd.K10847/lib/virtio_blk.ko' [elf32-i386]
copy from `/lib/modules/2.6.39-400.215.10.el5uek/kernel/drivers/virtio/virtio_pci.ko' [elf32-i386] to `/tmp/initrd.K10847/lib/virtio_pci.ko' [elf32-i386]
/sbin/lvm.static -> /tmp/initrd.K10847/bin/lvm
/sbin/dmraid.static -> /tmp/initrd.K10847/bin/dmraid
/sbin/kpartx.static -> /tmp/initrd.K10847/bin/kpartx
Adding module crc-t10dif
Adding module sd_mod
Adding module mbcache
Adding module jbd
Adding module ext3
Adding module ata_generic
Adding module ata_piix
Adding module pata_acpi
Adding module libahci
Adding module ahci
Adding module dm-mod
Adding module dm-log
Adding module dm-region-hash
Adding module dm-mirror
Adding module dm-zero
Adding module dm-snapshot
Adding module virtio_blk
Adding module virtio_pci
[root@localhost ~]#

Now let's confirm if virtio modules are present:

[root@localhost ~]# cp -p /boot/initrd-`uname -r`.img /tmp/initrd-`uname -r`.img.gz
[root@localhost ~]# zcat /tmp/initrd-`uname -r`.img.gz | cpio -it | grep virtio
17527 blocks
lib/virtio_blk.ko
lib/virtio_pci.ko
[root@localhost ~]#

Excellent. The VM is ready to be uploaded to Oracle Cloud.


Exporting the VMware VM from ESX:


Follow the instructions in the article  How to export VMware VM using Oracle Ravello VM Tool.


Uploading the VM's Files to Oracle Cloud

Follow the instructions in the article How to create an Instance Custom Template in Oracle Cloud using VMware VMDK Files.


Creating the Instance


Specify the name of the new OCI Instance, in my example is "LinuxVM". Then Select the Image by clicking on the button "Change Image", here is where you have to select the Custom Image Template we just created previously, in my example "VMWare Image". Finally Select the Shape for your instance, and then click on the button "Create":


The Instance will start to get created:


After some seconds the OCI Instance will be fully created and ready to be used, you can use the Public IP to test the connectivity:


Verification of the Migration


The basic test, just a Ping:


Create a Console Connection to Visualize with VNC the Desktop following the instruction in my previous article "How to create a VCN in Oracle Cloud Infrastructure (OCI)"


Check the File we created at the beginning of the article, to confirm it's our former VMware VM :)


lunes, 13 de abril de 2020

How to connect with VNC to Oracle OCI Instance (Not GUI)

Oracle Cloud Infrastructure provides "Instance Console Connections" which basically allow to connect to an OCI Instance, The documentation provides the following definition:

Instance Console Connections

The Oracle Cloud Infrastructure Compute service provides console connections that enable you to remotely troubleshoot malfunctioning instances, such as:

  • An imported or customized image that does not complete a successful boot.
  • A previously working instance that stops responding.
There are two types of instance console connections:
  • Serial console connections
  • VNC console connections


In this article I will show how to connnect using VNC.

First, Go to your Oracle Cloud account, and then "Compute" -> Instances:


Click on your Instance Name, in this example "LinuxVM2":


Then clic in "Console Connections", This is at the bottom of the page:


Click  in "Create Console Connection":


You have to create the Keys previously, here just upload the "Public Key" by clicking on "Browse". Then click on "Create Console Connection":


Click on the three points you see at the right " . . ." and then "Connect with VNC":


Select the Operating System you are using, in my Case it's windows. Copy the command line and then paste it in a Text Editor (Notepad, for example)


In the Text Editor Replace the value “$env:homedrive$env:homepath\oci\console.ppk” with the Path of your Private Key, in my case is “C:\Users\Deiby\Documents\privateOCI.ppk"

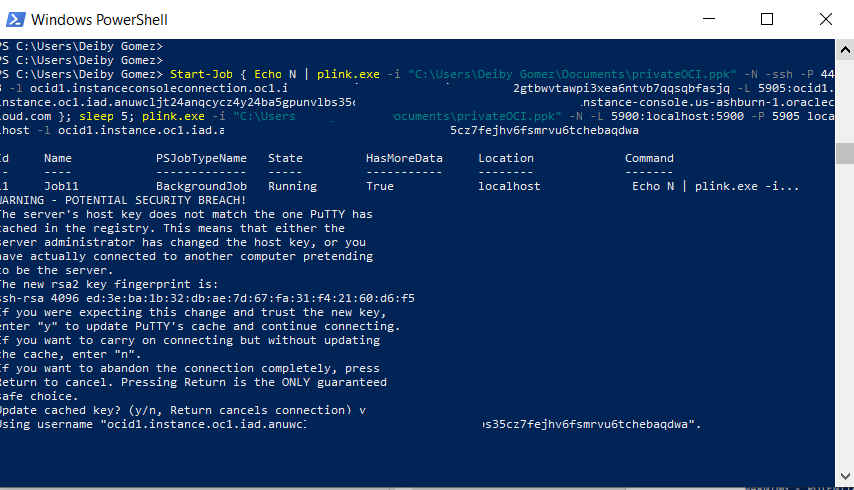
Now we have to run the new Command line in "PowerShell":


Paste it in PowerShell and you will have to type "y" when it asks you. Once done a Tunel has been created and now youcan connect using VNC.


To connect with VNC, just use "localhost:5900"


Now you can see what's going on in the Console, this console is persitent to reboots of the Instance, that's why you can use to fix problems.


viernes, 3 de abril de 2020

Cómo restaurar RMAN Backups desde Oracle Cloud Object Storage

Si ocurre una falla critica en nuestro sitio principal y los servidores de nuestra base de datos no funcionan, es posible usar nuestros RMAN Backups almacenados en la nube para restaurar a un nuevo host. El siguiente ejemplo muestra cómo restaurar un RMAN backup desde un Oracle Cloud Object Storae a un nuevo host.

Requerimientos previos:
  • Nuevo host: Windows Server 2012 R2.
  • Binarios de Oracle instalados.
  • DBID de la base de datos que necesitemos restaurar.
  • Contraseña que usamos para encriptar los backups. (opcional)
  • Debemos tener configuradas nuestras keys para acceso al Oracle Cloud Object Storage. Para esto podemos verificar los primeros tres pasos en el siguiente articulo (link del articulo anterior) .
Configurando RMAN

Cuando tengamos configurada las API KEYS para poder establecer la conexión desde nuestro servidor Windows hacia nuestro Bucket en la nube. El siguiente paso será configurar las características de RMAN para que la extracción de backup pieces se realice de forma automática. La siguiente línea es un ejemple de configuración:

rman target /
rman> CONFIGURE CHANNEL DEVICE TYPE 'SBT_TAPE' PARMS  'SBT_LIBRARY=C:\app\Administrator\product\11.2.0\dbhome_1\LIB\oraopc.dll, SBT_PARMS=(OPC_PFILE=C:\app\Administrator\product\11.2.0\dbhome_1\database\opc_config\configORCL.ora)';
  • La ruta de la librería configORCL.ora dependerá de donde realizamos la instalación durante la configuración de acceso del modulo OCI.
  • La ruta del Oracle Home dependerá de donde realizamos la nueva instalación de los binarios en el nuevo host.


Restaurando la base de datos

Una vez configurado el acceso al bucket en la nube, procederemos a restaurar nuestra base de datos. Como en este caso en particular estamos usando un servidor Windows, nuestro primer paso será crear un servicio con el binario oradim.

C:\> oradim -NEW -SID orcl -STARTMODE auto -PFILE C:\app\Administrator\product\11.2.0\dbhome_1\database\initORCL.ora
  • El archivo initORCL.ora solo necesita tener el parámetro db_name definido.

A continuación, montamos la base de datos; establecemos el DBID de la base de datos; establecemos la contraseña (en caso hayamos usado encriptación) y restauramos el SPFILE.

rman target /
RMAN> STARTUP NOMOUNT;
RMAN> SET DBID=1559774388;
RMAN> RUN {
allocate channel t1 device type sbt PARMS 'SBT_LIBRARY=C:\app\Administrator\product\11.2.0\dbhome_1\LIB\oraopc.dll, SBT_PARMS=(OPC_PFILE=C:\app\Administrator\product\11.2.0\dbhome_1\database\opc_config\configORCL.ora)';
RESTORE SPFILE TO PFILE 'C:\app\Administrator\product\11.2.0\dbhome_1\dbs\initORCL.ora' FROM AUTOBACKUP;
}

Nota: Una vez restaurado el pfile, nos dirigimos a la ruta destino y modificamos el archivo de modo a concordar todos los parámetros *_dest con los nuevos destinos en el servidor en caso hayan cambiado y también modificamos el parámetro contro_files en caso el destino también haya cambiado.

Apagamos la instancia y encendemos nuevamente en modo NOMOUNT para restaurar los control files desde el backup en la nube. Una vez finalizada la restauración, montamos la base de datos:


RMAN> SHUTDOWN IMMEDIATE;
RMAN> STARTUP NOMOUNT;
RMAN> RUN {
allocate channel t1 device type sbt PARMS 'SBT_LIBRARY=C:\app\Administrator\product\11.2.0\dbhome_1\LIB\oraopc.dll, SBT_PARMS=(OPC_PFILE=C:\app\Administrator\product\11.2.0\dbhome_1\database\opc_config\configORCL.ora)';
RESTORE CONTROLFILE FROM AUTOBACKUP;
} 
RMAN> ALTER DATABASE MOUNT;


El siguiente paso será restaurar nuestra base de datos, para esto podemos usar la cantidad de CHANNELS que consideremos adecuada según las características de nuestro servidor.


RMAN> RUN {
allocate channel t1 device type sbt PARMS 'SBT_LIBRARY=C:\app\Administrator\product\11.2.0\dbhome_1\LIB\oraopc.dll, SBT_PARMS=(OPC_PFILE=C:\app\Administrator\product\11.2.0\dbhome_1\database\opc_config\configORCL.ora)';
allocate channel t2 device type sbt PARMS 'SBT_LIBRARY=C:\app\Administrator\product\11.2.0\dbhome_1\LIB\oraopc.dll, SBT_PARMS=(OPC_PFILE=C:\app\Administrator\product\11.2.0\dbhome_1\database\opc_config\configORCL.ora)';
allocate channel t3 device type sbt PARMS 'SBT_LIBRARY=C:\app\Administrator\product\11.2.0\dbhome_1\LIB\oraopc.dll, SBT_PARMS=(OPC_PFILE=C:\app\Administrator\product\11.2.0\dbhome_1\database\opc_config\configORCL.ora)';
RESTORE DATABASE;
}

Nota: si alguno de los archivos restaurados estará en una ubicación diferente al servidor original, recuerde utilizar la sentencia SWITCH DATAFILE ALL y los respectivos comandos RENAME para cada datafile como se muestra en el ejemplo siguiente:


SWITCH DATAFILE ALL;
SQL "ALTER DATABASE RENAME FILE ''+DATA/ASMDEMO1/ONLINELOG/group_3.263.873380343'' TO ''/u04/app/oracle/redo/redo03.log''";


Hasta ahora todo debería haber terminado sin error, en el siguiente paso exploraremos el ultimo SCN almacenado en nuestro RMAN Backup en la nube para saber el punto exacto hasta donde recobrar nuestra base de datos. Lo haremos mediante el siguiente comando:

RMAN> RESTORE DATABASE PREVIEW DEVICE TYPE SBT;

La salida del comando debe mostrar algo similar a esto:


  List of Archived Logs in backup set 7
  Thrd Seq     Low SCN    Low Time  Next SCN   Next Time
  ---- ------- ---------- --------- ---------- ---------
  1    8       972699     10-FEB-20 972727     10-FEB-20
List of Archived Log Copies for database with db_unique_name ORCL
=====================================================================

Key     Thrd Seq     S Low Time
------- ---- ------- - ---------
8       1    1       A 13-FEB-20
        Name: C:\APP\ADMINISTRATOR\RECOVERY_AREA\ORCL\ARCHIVELOG\2020_02_13\O1_MF_1_1_H4BV1Y4V_.ARC

9       1    2       A 13-FEB-20
        Name: C:\APP\ADMINISTRATOR\RECOVERY_AREA\ORCL\ARCHIVELOG\2020_02_13\O1_MF_1_2_H4C9MLFR_.ARC

10      1    3       A 13-FEB-20
        Name: C:\APP\ADMINISTRATOR\RECOVERY_AREA\ORCL\ARCHIVELOG\2020_04_01\O1_MF_1_3_H89H6ZXY_.ARC

11      1    4       A 01-APR-20
        Name: C:\APP\ADMINISTRATOR\RECOVERY_AREA\ORCL\ARCHIVELOG\2020_04_01\O1_MF_1_4_H89J0GX0_.ARC

12      1    5       A 01-APR-20
        Name: C:\APP\ADMINISTRATOR\RECOVERY_AREA\ORCL\ARCHIVELOG\2020_04_08\O1_MF_1_5_H8W240W6_.ARC

13      1    6       A 08-APR-20
        Name: C:\APP\ADMINISTRATOR\RECOVERY_AREA\ORCL\ARCHIVELOG\2020_04_09\O1_MF_1_6_H8YO7R8C_.ARC

validation succeeded for backup piece
Media recovery start SCN is 972705
Recovery must be done beyond SCN 972705 to clear datafile fuzziness
validation succeeded for backup piece
Finished restore at 09-APR-20


Recobramos nuestra base de datos usando el numero indicado en el comando anterior:

RMAN> RUN {
allocate channel t1 device type sbt PARMS 'SBT_LIBRARY=C:\app\Administrator\product\11.2.0\dbhome_1\LIB\oraopc.dll, SBT_PARMS=(OPC_PFILE=C:\app\Administrator\product\11.2.0\dbhome_1\database\opc_config\configORCL.ora)';
RECOVER DATABASE UNTIL SCN  972705;
}

El comando debería finalizar sin ningún error, una vez terminado procederemos a abrir nuestra base de datos usando la opción RESETLOGS:

RMAN> ALTER DATABASE OPEN RESETLOGS;

Como paso final debemos asegurarnos de que nuestra base de datos funcione como la original, creando LISTENERS y recuperando cualquier otra configuración que haya tenido el servidor anterior.

Conclusión: Los pasos para restaurar una base de datos son básicamente los mismos que en cualquier caso común, la clave del ejercicio radica en como configuremos el acceso a nuestro Oracle Cloud Storage Service.


jueves, 2 de abril de 2020

Scaling up/down a database instance in Oracle Cloud Classic

If a database deployment in Oracle Database Classic Cloud Service is performing poorly or it is running out of storage, you can scale up the environment so that you can achieve the necessary resources.

On next, we will show how to scale up/down using a database instance service.

First Step: Log in to the Oracle Cloud Services and select 'Database'


You will see all the active instances, select the instance you want to scale up/down. Click on the name of the database service.


Before continuing, you must stop all the services using the database instance, if you don’t, the scale up/down process won’t start and a Message Error will be shown. Once the services using the database have been stopped, click on the  icon and click on Scale Up/Down.


Now, we must know some restrictions:
    • We can increase any filesystem size or create new file systems, but, it is not possible to decrease the size or delete an already created file system.
    • After any modification the virtual machine hosting the database will be rebooted.
    • Any change will be reflected in our bill at the end of the month. You should check the prices before any change.
The Scale up/down instance form has the next values:


We have the next options:
  • Increase or decrease the VM characteristics changing the Compute Shape. The options are:
    • OC1m – 1.0 OCPU, 15.0 GB RAM
    • OC2m – 2.0 OCPU, 30.0 GB RAM
    • OC3m – 4.0 OCPU, 60.0 GB RAM
    • OC4m – 8.0 OCPU, 120.0 GB RAM
    • OC5m – 16.0 OCPU, 240.0 GB RAM
    • OC8m – 24.0 OCPU, 360.0 GB RAM
    • OC9m – 32.0 OCPU, 480.0 GB RAM
  • Increase the size of the actual file system on our server or create new file systems.

Finally, click on the Yes, Scale Up/Down button. You well see a confirmation message and after that the virtual machine will be rebooted.

Remember to start all dependent services once the rebooted has finished.

miércoles, 1 de abril de 2020

oraopc.dll y ORA-27211: Failed to load Media Management Library

Escenario:
  • Oracle Database EE 12C
  • Microsoft Windows Server 2012 x64 (64-bit)
Comando ejecutado:


rman target /
set encryption ON identified by "dsk45opT4dihg_0f_XXXXXXds7" Only;
run {
allocate channel sbt1 device type sbt PARMS 'SBT_LIBRARY= D:\app\oracle\product\12.0.0\database\lib\libopc.dll, SBT_PARMS=(OPC_PFILE= D:\app\oracle\product\12.0.0\db\config.ora)';
backup backupset completed after 'sysdate-1';
}

Error:

RMAN-00571: ===========================================================
RMAN-00569: =============== ERROR MESSAGE STACK FOLLOWS ===============
RMAN-00571: ===========================================================
RMAN-03009: failure of allocate command on t1 channel at 11/16/2015 06:47:37
ORA-19554: error allocating device, device type: SBT_TAPE, device name:
ORA-27211: Failed to load Media Management Library

Causa:

Para que la librería libopc.dll funcione correctamente en Windows necesita de la librería complementaria MSVCR100.dll.


Solución:

Se debe instalar la librería MSVCR100.dll dentro del directorio $ORACLE_HOME\bin.

Para obtener la librería debemos descargarla desde https://www.microsoft.com/en-us/download/details.aspx?id=40784

El paquete de instalación ejecutará un wizard que descomprimirá la librería dentro de las librerías de Windows. Una vez instalada copiamos y pegamos el archivo MSVCR100.dll dentro de nuestro directorio $ORACLE_HOME\lib.

Referencia: Oracle Support Document 2078347.1

Oracle ACE Director Award - Deiby Gómez

Thanks #OracleACE Program for this awesome certificate recognizing the work I have done in the community for the last year. Looking forwa...